 |
| Crochet babushka doll Easter egg |
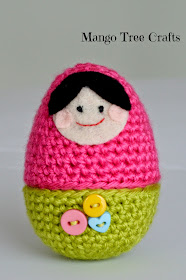
Who doesn't like nesting dolls also known as Babushka or Matryoshka dolls? I certainly like them a lot. I designed this crochet Easter egg Babushka doll to fit a large size plastic Easter egg.
Materials:
- Worsted weight acrylic yarn in two colours ( I used Caron Simply Soft in Watermelon and Chartreuce)
- Hook G (4mm)
- Larger size plastic Easter egg (3.5" high)
- Tapestry needle, hot glue gun
- Felt in colours: white (for face), baby pink (for cheeks), and black (for hair)
- Buttons, regular sewing thread and needle for embroidering eyes and mouth
SC - single crochet
ST - stitch
Crochet pattern:
I crocheted the two egg parts separately and then sewed them together.
Top part of the egg:
Start with a Magic Ring and work in spiral.
Round 1: 4SC in magic ring (4)
Round 2: 2SC in each ST around (8)
Round 3: *SC in next ST, 2SC in next ST* four times (12)
Round 4: *SC in next 2 ST, 2SC in next ST* four times (16)
Round 5: *SC in next 3 ST, 2SC in next ST* four times (20)
Round 6: *SC in next 4 ST, 2SC in next ST* four times (24)
Round 7: *SC in next 5 ST, 2SC in next ST* four times (28)
Round 8-9: SC in each ST around (28)
Round 10: *2SC in next ST, SC in next 13 ST* two times (30)
Round 11- 15: SC in each ST around (30). Fasten off leaving a long tail for sewing.
Bottom part of the egg:
Start with a Magic Ring and work in spiral.
Round 1: 6 SC in magic ring (6)
Round 2: 2SC in each ST around (12)
Round 3: *SC in next ST, 2SC in next ST* six times (18)
Round 4: *SC in next 2 ST, 2SC in next ST* six times (24)
Round 5: *SC in next 3 ST, 2SC in next ST* six times (30)
Round 6-10: SC in each ST around (30). Fasten off and weave in ends.
Face:
- Cut a bigger circle out of white felt for face (approx. 3/4"), two small circles out of pink felt for cheeks, and hair (use black or brown felt).
- Embroider eyes and mouth with regular sewing thread.
- Hot glue the cheeks and the hair to the face.
- Sew the top to the bottom (approx. 5-6 stitches) for the hinge.
- Sew buttons to the front of the bottom part of the egg.
- Hot glue crochet egg to the plastic egg. (I put some glue at the wrong side of the pointy parts of the egg and to the wrong side of the edges).
- Hot glue face to the body.
Lili
***Please do not copy and post this pattern and claim it as your own. Please do not re-publish photos as your own.***

.jpg)

No comments:
Post a Comment
Note: only a member of this blog may post a comment.